
Fresh bread tells a lot about quality and care. I once brought home a loaf from the Publix bakery, and the fresh bakery smell filled my kitchen.
The first bite was very soft. Soon after, the bread turned dry faster than I hoped, and another loaf once felt a bit gummy. That showed me Fresh White Mountain Bread tastes best early, yet it needs special care.
This bread is softer than standard sandwich bread, less crusty than artisan bread, and has a light sweet flavor.
The round mountain-style shape also looks beautiful on the table. Publix bakery has a strong reputation for soft sandwich loaves, and I really wanted a homemade version that stays soft longer.
Many people store soft bread the wrong way, and freshness matters for texture and sandwiches.
That is why I love sharing this Publix White Mountain Bread Recipe so anyone can bake a soft, slightly sweet, mountain-shaped loaf at home.
Why Is It Called White Mountain Bread
The name comes from how the bread looks. Publix Super Markets sells this special bakery bread. The top has white flour dust. It looks like snow on a mountain. The round shape rises high like a mountain peak.
Old bakers called round loaves “mountain bread” because of this shape. Publix made this style famous in their stores.
People loved the soft texture and pretty look. The flour on top keeps the crust soft. It also makes the bread look beautiful. When you slice it, the inside is fluffy and white.
Why Is Publix White Mountain Bread So Soft and Fluffy
Every time I eat this bread, it feels like a cloud. The texture is always perfect. I love how it melts in my mouth.
- Flour Type Matters: Using all-purpose flour gives the right protein level. It forms soft gluten strands instead of strong ones. This keeps the bread tender, not tough.
- Water and Kneading Balance: Warm water helps wake up the yeast gently. Slow, careful kneading builds structure without stress.
- Sweet and Fat Mix: Honey adds mild sweetness and helps hold moisture. Butter makes the crumb soft and rich. Together, they create that bakery-soft texture.
- Cooling Before Slicing: Letting the bread cool fully helps the inside set. Cutting it too soon can make it gummy. A little patience gives clean, even slices.
- Proper Shaping Technique: Tight shaping creates gentle tension on the outside. This traps air inside the dough. The loaf holds its form while staying soft.
- No Overmixing: Gentle handling protects the dough structure. Too much mixing makes bread dense and tough. Light kneading keeps it soft and airy.
Publix White Mountain Bread Ingredients
- 4 cups all-purpose flour: Flour is the main ingredient that creates the bread structure. Bread flour can replace all-purpose flour for extra chewiness if you prefer a denser crumb.
- 1½ cups warm water (105–115°F): Warm water activates the yeast and starts the rising process. Using cool water will still work, but the dough will rise more slowly.
- 1 teaspoon active dry yeast: Yeast helps the bread rise and creates soft air pockets. Instant yeast can be used as a one-to-one substitute with similar results.
- 2 tablespoons honey: Honey adds gentle sweetness and helps keep the bread moist longer. Granulated sugar can replace honey in the same amount, though the flavor will be less rich.
- 2 tablespoons unsalted butter, softened: Butter adds richness and keeps the crumb tender. Vegetable oil can be substituted in equal amounts for a slightly lighter texture.
- 2 teaspoons salt: Salt enhances flavor and controls yeast activity. Fine sea salt works the same as table salt in equal measurements.
Kitchen Equipment Needed
- Large mixing bowl — dough mixing
- Measuring cups — accurate flour measure
- Measuring spoons — yeast and salt measure
- Dough scraper — shaping help
- Banneton basket — proofing shape support
- Parchment paper — easy transfer
- Razor blade — scoring top
- Oven — baking heat source
- Cooling rack — air flow cooling
How to Make Publix White Mountain Bread
Step 1 | Mix the Dough
In a large mixing bowl, whisk together the flour, salt, and yeast. Add the warm water, honey, and softened butter. Mix with a wooden spoon until a shaggy dough forms and no dry flour remains.

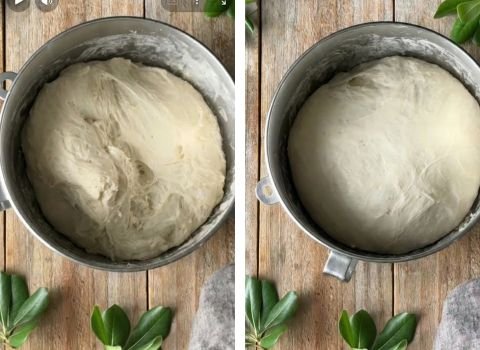
Step 2 | Stretch and Fold the Dough
Cover the bowl and let the dough rest for 30 minutes. Perform the stretch-and-fold method by pulling one side of the dough up and folding it over the center.
Rotate the bowl and repeat three to four times. Cover and rest for 30 minutes. Repeat this stretch-and-fold process two more times, resting 30 minutes between each round, until the dough feels smoother and elastic.
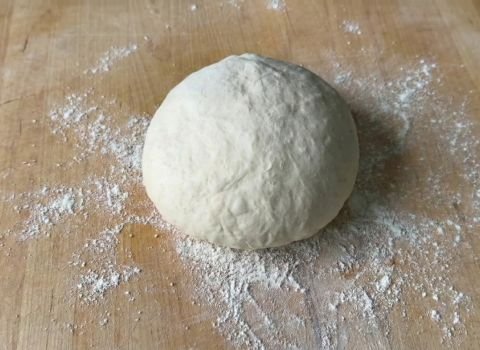
Step 3 | Shape the Dough
Turn the dough onto a lightly floured surface. Shape it into a tight ball by pulling the edges underneath and rotating the dough to create surface tension.
Step 4 | Bulk Fermentation
Place the shaped dough back into the bowl, seam-side down. Cover and let it rise until doubled in size, about 2 to 3 hours depending on room temperature.
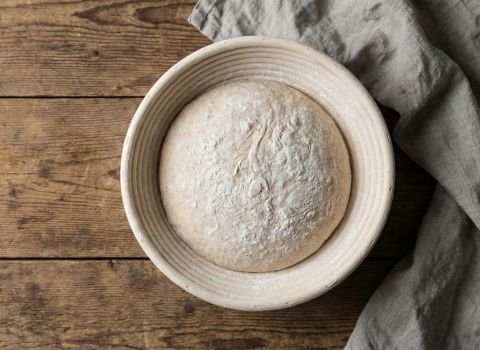
Step 5 | Prepare the Banneton
Lightly spray your banneton basket with water and dust it generously with flour to prevent sticking.
Step 6 | Final Shaping
Turn the risen dough onto a floured surface and gently flatten it into a rectangle. Fold one long side toward the center, then fold the other side over it.
Repeat this folding motion two or three times, then shape the dough into a tight round loaf.

Step 7 | Second Rise
Place the dough seam-side up into the prepared banneton. Cover and let it rise at room temperature for 45 to 60 minutes until puffy.
Step 8 | Preheat and Score
Preheat your oven to 450°F with a Dutch oven inside. Turn the proofed dough onto parchment paper and score an “X” on top using a sharp blade.
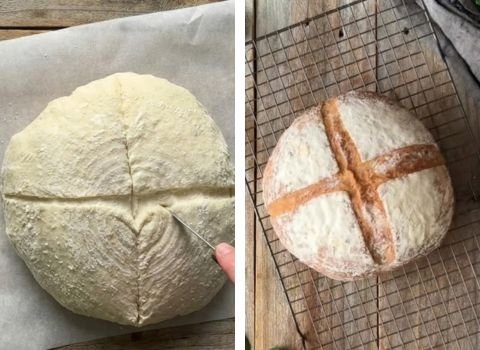
Step 9 | Cool & Serve
Carefully place the dough into the hot Dutch oven. Cover and bake for 30 minutes, then uncover and bake for another 15 to 20 minutes until golden brown.
Remove and let the bread cool completely on a wire rack before slicing. Enjoy with butter.

Tips to Get Bakery-Style Results at Home
- Use a Kitchen Scale: Weighing your flour gives consistent results every time. Measuring by cups can add too much flour and make the bread dense. A scale helps keep the loaf light and soft.
- Check Yeast Freshness: Old yeast may not rise properly. Test it by mixing yeast with warm water and a little sugar. It should bubble within 10 minutes. Fresh yeast gives better volume and texture.
- Don’t Rush the Resting Times: Resting helps build flavor and strengthen the dough. Skipping or shortening these times can make the bread tough. Follow the resting times for the best crumb.
- Preheat the Oven Completely: A fully heated oven is important for good oven spring. Preheat the oven and Dutch oven for 20–30 minutes. Proper heat helps the bread rise quickly and set its shape.
Serving Suggestions
Fresh bread deserves a beautiful presentation on your table. Slice your cooled loaf with a serrated knife using gentle sawing motions to keep the soft crumb intact.
Your bread looks golden and inviting with that flour-dusted crust, making any meal feel special.
- Serve Warm with Butter: Butter melts into warm slices, creating a simple but delicious treat. The soft crumb soaks up every bit of rich flavor perfectly.
- Make Sandwiches for Lunch: This bread’s tender texture holds fillings well without falling apart. Layer your favorite meats, cheeses, and vegetables for an easy, satisfying meal.
- Toast for Breakfast: Slice and toast until golden for a crisp outside and soft center. Add jam, honey, or your favorite spread for a comforting morning bite.
- Serve Alongside Soup or Stew: Soft bread is perfect for dipping into warm soups and broths. It absorbs flavor without turning mushy or hard.
- Share with Neighbors: Homemade bread makes a thoughtful gift when freshly baked. Friends and family will appreciate the care and effort behind every loaf.
Storage, Make-Ahead and Reheating Guide
Make-Ahead Tips: You can prepare dough up to twenty-four hours ahead. After your first stretch and fold, refrigerate the covered dough overnight. This slow, cold rise develops deeper flavor and makes shaping easier the next day.
Room Temperature Storage: Keep the whole loaf in a bread bag at room temperature for up to 3 days.
Freezing Instructions: For longer storage, slice the cooled loaf. Place the slices in a freezer bag, press out the air, and freeze for up to 3 months. Toast slices straight from the freezer.
Reheating Process: To refresh a whole loaf or several slices, wrap them in foil. Warm in a 350°F oven for 10 minutes. For a single slice, toasting works best.
Publix White Mountain Bread Recipe FAQs
1. Why Didn’t My Bread Rise Properly?
Poor rise often comes from inactive yeast or water that was too hot or too cool. Yeast needs warmth to activate, yet excess heat damages it. Salt placed directly on yeast may slow growth.
Measuring yeast carefully also matters. A cool kitchen slows rising, so extra time helps. Dough should double before baking to achieve the soft crumb expected from a White Mountain-style loaf.
2. Why Is My Crust Too Hard?
A hard crust forms from baking too long or using dry oven heat. This bread needs gentle browning, not heavy crisping.
Butter and honey help soften the exterior, though overbaking overrides that benefit.
Covering bread loosely during cooling also reduces crust toughness while keeping the inside tender and smooth.
3. Why Did My Bread Collapse After Baking?
Collapse happens when dough rises too much before baking. Over proofed dough loses strength and cannot hold shape in the oven. Scoring too deep may also weaken the surface.
Proper shaping creates tension that supports the loaf. Baking once dough springs back slowly to touch prevents collapse.
4. How Do I Fix Sticky Bread Dough?
Sticky dough improves with resting. Flour absorbs water over time, making handling easier. Light flouring on hands and surface helps, though excess flour changes texture.
Using a dough scraper keeps shaping clean. Stretch and fold steps build strength without adding dryness, keeping the crumb soft.
5. Can I Make Publix White Mountain Bread Without a Bread Machine?
Yes, this recipe works well by hand. Stretch and fold steps replace machine kneading. Hand mixing gives better control over texture and hydration.
Many bakery loaves rely on manual techniques for softness. With patience and timing, home bakers achieve results very close to bakery bread without machines.
6. Why Is My Bread Pale on Top?
A pale top often comes from low oven heat or short baking time. Honey helps browning, though proper temperature matters most.
Steam escapes early when ovens open too soon, slowing color development.
Baking until golden ensures proper structure and flavor while matching the classic White Mountain appearance.
7. Can I Use Milk Instead of Water?
Milk adds richness and softness. It slightly sweetens the crumb and improves color. Warm milk should stay within yeast-safe temperature.
Whole milk works best, though lower-fat options still perform well. Milk shortens shelf life slightly, so storage care becomes more important.
8. Can I Add Eggs to This Bread Recipe?
Eggs add richness and softer crumb but change texture slightly. Egg breads feel richer and heavier than classic White Mountain Bread.
Adding one egg requires reducing water slightly. Egg addition also deepens crust color during baking due to protein and sugar content.
9. How Do I Get More Flavor in the Bread?
Longer fridge proof after folds adds taste. Honey boosts mild sweet. Butter gives richness. Fresh yeast better. Don’t rush rises. Bake golden for crust flavor. Simple changes deepen bakery feel.

Publix White Mountain Bread Recipe
This Publix White Mountain Bread recipe creates a fluffy, soft loaf with a tender crumb and lightly sweet flavor - bakery-style at home.
Ingredients
- 4 cups all-purpose flour
- 1½ cups warm water (105–115°F)
- 1 teaspoon active dry yeast
- 2 tablespoons honey
- 2 tablespoons unsalted butter, softened
- 2 teaspoons salt
Instructions
- In a large mixing bowl, whisk together the flour, salt, and yeast. Add the warm water, honey, and softened butter. Mix with a wooden spoon until a shaggy dough forms and no dry flour remains.
- Cover the bowl and let the dough rest for 30 minutes. Perform the stretch-and-fold method by pulling one side of the dough up and folding it over the center.
- Rotate the bowl and repeat three to four times. Cover and rest for 30 minutes. Repeat this stretch-and-fold process two more times, resting 30 minutes between each round, until the dough feels smoother and elastic.
- Turn the dough onto a lightly floured surface. Shape it into a tight ball by pulling the edges underneath and rotating the dough to create surface tension.
- Place the shaped dough back into the bowl, seam-side down. Cover and let it rise until doubled in size, about 2 to 3 hours depending on room temperature.
- Lightly spray your banneton basket with water and dust it generously with flour to prevent sticking.
- Turn the risen dough onto a floured surface and gently flatten it into a rectangle. Fold one long side toward the center, then fold the other side over it. Repeat this folding motion two or three times, then shape the dough into a tight round loaf.
- Place the dough seam-side up into the prepared banneton. Cover and let it rise at room temperature for 45 to 60 minutes until puffy.
- Preheat your oven to 450°F with a Dutch oven inside. Turn the proofed dough onto parchment paper and score an “X” on top using a sharp blade.
- Carefully place the dough into the hot Dutch oven. Cover and bake for 30 minutes, then uncover and bake for another 15 to 20 minutes until golden brown. Remove and let the bread cool completely on a wire rack before slicing. Enjoy with butter.
Nutrition Information:
Serving Size: 1 slice (assuming 12 slices per loaf)Amount Per Serving: Calories: 160Total Fat: 4gSaturated Fat: 2.5gCholesterol: 7mgSodium: 200mgCarbohydrates: 28gFiber: 1gSugar: 3gProtein: 4g
This Publix White Mountain Bread Recipe gives steady, reliable results with soft crumb and light sweet flavor. The steps are simple and clear.
Try baking this loaf and share slices with friends and loved ones.