
Carl’s Jr. is a famous American fast-food chain. They have a large number of menu items and are famous for their charbroiled burgers. But one recipe item that got my attention on their menu is their Fried Zucchini.
I was wondering when I saw it on their menu as a signature item. It made me more curious how this simple vegetable can be a signature item. I ordered it and it was so satisfying – inside and outside both were perfect, crispy and tender.
Later they told me Fried Zucchini already had a fan base at Carl’s Jr. Now I have become a fan of this Carl’s Jr. Fried Zucchini Recipe.
Today, I’m sharing a copycat Carl’s Jr Fried Zucchini Recipe with you. Now you can make it at home anytime you want. You don’t need to leave your house or spend money at the restaurant.
What Type of Zucchini Works Best for Fried Zucchini
Medium-sized zucchini works best for this recipe. Look for zucchini with firm skin because that gives you a better crisp texture when fried.
Avoid zucchini that feels soft or is too mature because it contains too much water. Fresh market zucchini is better than pre-cut packs from the grocery store.
Pick zucchini that feels heavy for its size and has a bright green color. This means the zucchini is fresh and has the right texture for frying.
Why Zucchini Works Better Than Other Vegetables for Frying
Zucchini has a naturally firm structure that holds the coating very well during frying. The mild flavor of zucchini lets your seasonings stand out without overpowering the dish.
When you prepare zucchini properly, it has lower water content than many other vegetables. This means less moisture inside when you cook it, which helps keep the outside crispy instead of soggy.
The perfect balance of texture and flavor makes zucchini the best choice for this fried recipe.
Carl’s Jr Fried Zucchini Ingredients
For the Fried Zucchini:
- 2 medium green or yellow zucchini, sliced into 1/2-inch thick rounds – These are your main ingredient. Medium-sized zucchini work best. Slice them into rounds about the thickness of a coin. Throw away the very end pieces because they are mostly skin and seeds.
- 1/2 cup all-purpose flour – Flour helps the egg stick to the zucchini. It creates the first layer for a crispy coating. All-purpose flour is perfect for this recipe.
- 1 teaspoon salt – Salt brings out the flavor of the zucchini. Use regular table salt or kosher salt. Kosher salt gives a nicer texture if you have it.
- 1/4 teaspoon black pepper – Black pepper adds a little spice and warmth to the coating. Use freshly ground pepper if possible.
- 2 large eggs, beaten – Eggs work as a glue to hold the breadcrumbs onto the zucchini. Beat them well so they mix together smoothly. You can use a fork to beat them.
- 1 1/2 cups panko breadcrumbs – Panko breadcrumbs create the super crispy outside layer. They are bigger than regular breadcrumbs, which makes them crunchier. Regular breadcrumbs work as a substitute if you cannot find panko.
- Oil for frying – You need about 1/4 inch of oil in your skillet. Use vegetable oil, canola oil, or peanut oil. These oils can handle high heat without smoking. Avoid olive oil because it burns at high temperatures.
For the Garlic Aioli Sauce:
- 1/3 cup mayonnaise – Mayo is the base of this sauce. Use regular mayo, not light mayo. Light mayo tastes flat and does not work as well.
- 1 garlic clove, pressed or minced – Fresh garlic adds amazing flavor. Press it through a garlic press or chop it very fine. Jarred minced garlic works as a substitute if you do not have fresh garlic.
- 1/2 tablespoon fresh lemon juice – Fresh lemon juice is essential—do not use concentrate. It adds brightness and cuts through the richness of the mayo. Lime juice works as a substitute for a different flavor twist.
- 1/4 teaspoon salt – A little salt brings all the sauce flavors together.
- 1/8 teaspoon black pepper – Pepper adds a light bite to the sauce.
Tools & Equipment Needed
- Cutting board – for slicing
- Sharp knife – clean cuts
- Mixing bowls – coating setup
- Fork or whisk – beat eggs
- Large skillet – frying pan
- Tongs – flip pieces
- Wire rack – keep crisp
- Paper towels – absorb oil
- Measuring cups/spoons – accuracy
- Thermometer (optional) – oil heat
How to Make Carl’s Jr Fried Zucchini
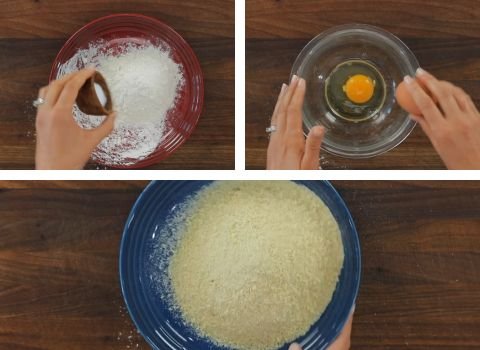
Step 1 | Set up the breading station
Get three shallow bowls. In the first bowl, mix flour, salt, and black pepper. In the second bowl, beat the eggs until smooth. In the third bowl, add panko bread crumbs.
Line them up in order so coating is quick and easy.
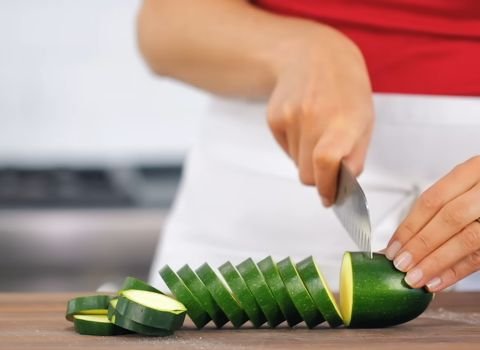
Step 2 | Slice the zucchini
Wash the zucchini. Cut off both ends. Slice into 1/2-inch thick rounds. Try to make all slices the same size so they cook evenly.
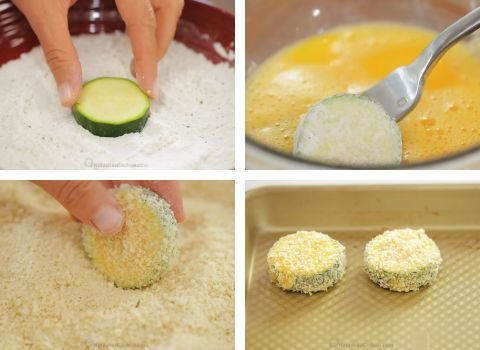
Step 3 | Dry and coat the zucchini
Pat the zucchini slices dry with paper towels. Dip each slice in the flour first and shake off the extra.
Next, dip it in the egg and let the extra drip off. Then coat it well in panko bread crumbs. Place each coated slice on a tray.
Step 4 | Heat the oil and fry the zucchini
Place a large skillet over medium heat and add about 1/4 inch of oil. Let it heat until hot. A small crumb should sizzle right away. Add the coated zucchini in a single layer.
Do not overcrowd the pan. Fry for about 2 minutes per side until golden brown and crispy.

Step 5 | Drain and season
Remove the fried zucchini and place on a wire rack or paper towels. Sprinkle with a little salt while hot for the best flavor.

Step 6 | Make the garlic aioli sauce
In a small bowl, mix mayonnaise, garlic, lemon juice, salt, and black pepper. Stir until smooth and creamy.

Step 7 | Serve and enjoy
Serve the homemade Carl’s Jr Fried Zucchini Recipe hot with the garlic aioli. They taste best fresh and crispy right out of the pan.

Expert Tips for Crispy, Non-Soggy Fried Zucchini
- Double Coat for Extra Crunch: Dip your zucchini in the egg and breadcrumbs two times. This gives you a thicker coating and a crunchier bite.
- Rest Coated Zucchini Before Frying: After coating all your slices, let them sit for 5 to 10 minutes. This helps the coating stick better and stay crisp while frying.
- Maintain Consistent Oil Temperature: Keep your oil around 350°F the whole time. If it cools down, the zucchini turns greasy. Let the oil heat back up between batches.
Other Cooking Methods
Air Fryer Method: Set your air fryer to 200°C or 400°F. Cook for 8–12 minutes, shaking the basket halfway through. Spray both sides of coated zucchini with a light oil spray before cooking. This method gives you crispy results with less oil and is a healthier choice.
Oven-Baked Method: Preheat your oven to 220°C or 425°F. Place coated zucchini on a wire rack set over a baking sheet. Spray both sides lightly with cooking spray. Bake for 18–20 minutes, flipping halfway through to get even browning on both sides. This is another good healthier option.
Deep Fry Method (Best for Authentic Taste): Heat oil to 175–180°C (350°F) in a deep skillet or pot. Fry the zucchini in batches for about 2 minutes per side until golden brown. This traditional method creates the crispiest, most authentic texture.
What to Serve with Fried Zucchini
Fried zucchini works great with lots of different side dishes and meals. Here are some of my favorite serving ideas for making a complete meal:
- Burgers – Juicy burgers pair perfectly with fried zucchini. The crispy coating adds a nice crunch that balances the soft bun and rich meat flavor.
- Grilled Chicken – Grilled chicken works great with fried zucchini. The light, smoky flavor of the chicken goes well with the crispy and tender zucchini.
- Sandwiches – Fried zucchini is a great side for sandwiches. It adds a crunchy bite next to soft bread and simple fillings like turkey or cheese.
- Fresh Salads – A fresh salad with lettuce, tomatoes, and light dressing pairs well. The crisp zucchini adds texture and makes the plate feel more balanced.
What Dipping Sauce Comes with Fried Zucchini?
When I serve fried zucchini, I like to pair it with a few dipping sauces so you can choose what fits your taste best. One of my go-to options is ranch dip.
I mix ranch seasoning with sour cream or mayo to make it creamy. It tastes cool, tangy, and smooth, and it goes perfectly with hot, crispy zucchini. You’ll love how it balances the crunch.
If you enjoy a bit of heat, spicy mayo is a great choice. I combine mayonnaise with hot sauce or sriracha, then add a squeeze of lemon juice for brightness. It turns creamy with a gentle kick, and you can adjust the spice level to your liking.
Another favorite of mine is garlic aioli. I blend mayo with fresh garlic, lemon juice, salt, and pepper. It comes out rich, smooth, and full of garlic flavor. When you dip your fried zucchini, you get a fresh and savory taste that feels more gourmet but still easy to enjoy.
For a classic dip, I suggest marinara sauce. I warm up store-bought sauce or use homemade tomato sauce. It adds a rich, tangy Italian-style flavor that pairs really well with crispy zucchini.
Storage Tips
How to Store Fried Zucchini – Let your cooked zucchini cool to room temperature before storing. Place them in an airtight container with paper towels on the bottom to absorb moisture.
Store them in the refrigerator for up to 3 days. Fried zucchini is best eaten fresh right after cooking.
Reheating Tips
Air Fryer: Heat your air fryer to 350 degrees Fahrenheit. Cook the zucchini for three to four minutes. This brings back the crispy texture almost perfectly. This is the best way to reheat.
Oven: Preheat your oven to 350 degrees Fahrenheit. Arrange zucchini on a baking sheet lined with foil. Heat for five to seven minutes until warm and crispy again. This works well and is simple.
Toaster Oven: Use your toaster oven at 350 degrees Fahrenheit for three to five minutes. This method works okay but may not crisp them up as well as a regular oven.
Microwave: The microwave makes fried zucchini soggy and rubbery. Avoid using the microwave if you want to keep them crispy. Use any other method instead.
Carl’s Jr Fried Zucchini Recipe FAQs
1. Can you make Carl’s Jr fried zucchini gluten-free?
Yes, gluten-free flour and gluten-free breadcrumbs can be used. The texture may be slightly different, but it still turns crispy. Make sure all ingredients are labeled gluten-free to avoid any issues.
2. How do you keep the coating from falling off?
Follow the coating steps carefully. Flour first, then egg, then breadcrumbs. Let the coated zucchini rest before frying so the coating sticks better.
3. How long does garlic aioli last in the fridge?
Homemade aioli stays fresh for up to 4 days in an airtight container. Keep it chilled. Do not leave it out at room temperature for more than 2 hours.
4. Do I need to peel the zucchini before frying?
No. Keep the skin on. The skin helps the zucchini hold its shape. It also adds a little color and extra nutrients. Just wash the zucchini well before slicing.

Carl’s Jr Fried Zucchini Recipe
Make crispy Carl’s Jr Fried Zucchini Recipe at home in just 35 minutes! Easy copycat recipe with golden crunch and garlic aioli dip.
Ingredients
For the Fried Zucchini:
- 2 medium zucchini, sliced into ½-inch rounds
- ½ cup all-purpose flour
- 1 teaspoon salt
- ¼ teaspoon black pepper
- 2 large eggs, beaten
- 1½ cups panko breadcrumbs
- Oil for frying (about ¼ inch in skillet)
For the Garlic Aioli Sauce:
- ⅓ cup mayonnaise
- 1 garlic clove, minced
- ½ tablespoon fresh lemon juice
- ¼ teaspoon salt
- ⅛ teaspoon black pepper
Instructions
- Get three shallow bowls. In the first bowl, mix flour, salt, and black pepper. In the second bowl, beat the eggs until smooth. In the third bowl, add panko bread crumbs. Line them up in order so coating is quick and easy.
- Wash the zucchini. Cut off both ends. Slice into 1/2-inch thick rounds. Try to make all slices the same size so they cook evenly.
- Pat the zucchini slices dry with paper towels. Dip each slice in the flour first and shake off the extra. Next, dip it in the egg and let the extra drip off. Then coat it well in panko bread crumbs. Place each coated slice on a tray.
- Place a large skillet over medium heat and add about 1/4 inch of oil. Let it heat until hot. A small crumb should sizzle right away. Add the coated zucchini in a single layer. Do not overcrowd the pan. Fry for about 2 minutes per side until golden brown and crispy.
- Remove the fried zucchini and place on a wire rack or paper towels. Sprinkle with a little salt while hot for the best flavor.
- In a small bowl, mix mayonnaise, garlic, lemon juice, salt, and black pepper. Stir until smooth and creamy.
- Serve the fried zucchini hot with the garlic aioli. They taste best fresh and crispy right out of the pan.
Nutrition Information:
Serving Size: (Per Serving – Approximate)Amount Per Serving: Calories: 280Total Fat: 19gSaturated Fat: 3gCholesterol: 95mgSodium: 480mgCarbohydrates: 22gFiber: 2gSugar: 3gProtein: 6g
This Carl’s Jr Fried Zucchini Recipe is an easy way to make this crispy favorite at home. The simple steps make it easy to change the seasonings or try different cooking methods.
Try it soon and enjoy how fresh zucchini tastes with a crunchy coating.